NCERT Solutions for Class 5 Maths Chapter 7 Shapes and Patterns – step-by-step answers to every exercise and in-text question of the chapter, as per the latest NCERT syllabus for 2027. Read them online or download the free question-answer PDF.
Chapter 7 of Math Mela is a workshop, not a lesson. You weave a paper mat, fit cut-out shapes around a point, cut a rhombus into four triangles and build new shapes with them, play with a tangram, stitch a design on a circle, count small cubes inside a big one, and fold paper nets into an icosahedron and a dodecahedron. Along the way you meet tessellation, the isosceles, equilateral and scalene triangles, the kite, the parallelogram and the rectangle.
NCERT Solutions for Class 5 Maths Chapter 7 Shapes and Patterns PDF
All the answers are on this page below. The PDF also explains every answer – why it is right and how to check it – so download it for revision.
| Chapter | Download | |
|---|---|---|
| Solutions PDF (English medium) | Shapes and Patterns | View PDF |
| Solutions PDF (Hindi medium) | आकार और प्रतिरूप | View PDF |
NCERT Solutions for Class 5 Maths Chapter 7 Shapes and Patterns – Questions and Answers
All 63 questions of the chapter (textbook pages 92 – 103) are answered below, in the order of the book – in-text questions, activities and the end-of-chapter exercises. Each answer is written the way you would write it in the exam.
Weaving Mats — Pages 92–93Making paper mats and writing the rule for each row
Follow the eight steps and you get a chequered mat — it looks like a chessboard, with the two colours swapping places in every row.
Row 2 — 1 over, 1 under, 1 over, 1 under, … (repeat)
Row 3 — same as Row 1 Row 4 — same as Row 2
Yes. Weave Row 1 as 2 over, 1 under again and again, and Row 2 as 2 under, 1 over again and again. Then Row 3 is like Row 1, Row 4 is like Row 2, and so on.
Here is the pattern written out band by band, for a mat with 12 bands. Weave your strips exactly like this.
| Band number | 1 | 2 | 3 | 4 | 5 | 6 | 7 | 8 | 9 | 10 | 11 | 12 |
|---|---|---|---|---|---|---|---|---|---|---|---|---|
| Row 1 | O | O | U | O | O | U | O | O | U | O | O | U |
| Row 2 | U | O | O | O | U | U | U | O | O | O | U | U |
| Row 3 | U | U | O | U | U | O | U | U | O | U | U | O |
| Row 4 | O | U | U | U | O | O | O | U | U | U | O | O |
(O = the strip passes over that band · U = the strip passes under it.)
Row 5 is the same as Row 1, Row 6 as Row 2, and so on — the design repeats after every 4 rows.
Yes. Sample answer — the purple mat (16 bands):
Row 2 — 3 over, 3 under, … (repeat)
Row 3 — 2 over, then 3 under, 3 over, … (repeat)
Row 4 — 2 under, then 3 over, 3 under, … (repeat)
Row 5 — 3 under, 3 over, … (repeat)
Row 6 — 1 over, then 3 under, 3 over, … (repeat)
Row 7 — same as Row 1, so the design repeats after 6 rows.
Let Us Try — Page 93Completing the grid design
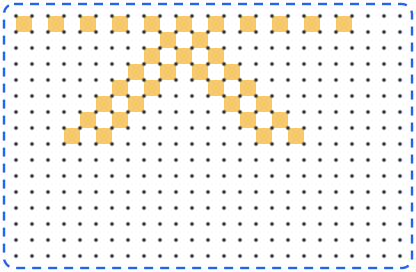
The completed design (21 squares by 21 squares):
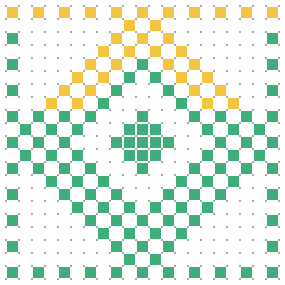
- Border: shade every other square all round the edge.
- Three diamond outlines, one inside the other, with a gap of one square between them. The given part is the top of the outer two.
- Centre: a small solid diamond of 13 squares (1, 3, 5, 3, 1 in five rows).
Tiling and Tessellation — Page 94Three regular pentagons around a point
No, a fourth pentagon will not fit. The empty space left is far too thin for it.
Leaving the gap would leave a hole in the floor; pushing a fourth pentagon in makes it overlap the others. So regular pentagons do not tessellate.
Find Out — Page 94Which regular shapes fit around a point
Yes, they fit perfectly. Six triangles fit around one point.
The six corners fill the whole turn round the point — no gap and no overlap. So equilateral triangles tessellate.
Yes, squares fit together with no gap and no overlap. You need 4 squares.
Every corner of a square is a right angle, and four right angles make one full turn round the point.
No. Five squares cannot fit around a point. The fifth one has to climb on top of the others.
Four squares already fill the whole turn round the point, so there is no room left for a fifth.
Yes. Three regular hexagons fit around a point.
Three hexagon corners fill the whole turn round the point, with no gap and no overlap — like a honeycomb.
Tiling and Tessellation — Page 95A pattern with more than one shape, and the regular octagon
Regular hexagons and equilateral triangles.
Look at the picture in the book. The big orange shapes have six equal sides — those are regular hexagons. The blue shapes between them have three equal sides — those are equilateral triangles.
Keep adding a purple hexagon with six yellow triangles around it, again and again. The little piece drawn in the book is the start of a hexagon-and-triangle tiling.
No. Regular octagons do not tessellate. Wherever two of them meet, a square hole is left behind.
Two octagons side by side leave a square-shaped gap, and a third octagon is too big for that gap — it would overlap.
Tiling and Tessellation — Page 96What meets at a marked point; squares and triangles together
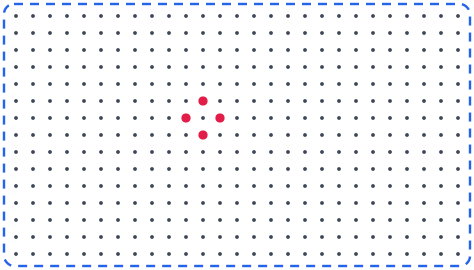
Sample answer: At each marked point, 2 squares and 3 triangles come together (once the pattern is continued). Yes, the same set of shapes meets at every marked point. To continue, keep repeating this group, then colour all squares one colour and all triangles another.
No, the triangles are not equilateral. Two sides of each triangle are equal — they are sides of the squares. The third side (red) is shorter: on the dot grid it goes straight across 2 spaces, while each slanting side goes 2 spaces across and 1 space up or down. So each triangle has only 2 equal sides.
Three triangles and two squares come together at each marked point (once the pattern is continued). Yes — the same five shapes meet at every marked point.
Walk round the big red dot in the picture above and count what you pass:
| Going round the point | Shape |
|---|---|
| 1st | Square |
| 2nd | Triangle |
| 3rd | Square |
| 4th | Triangle |
| 5th | Triangle |
| In all | 2 squares + 3 triangles |
Sample answer — four patterns that work: (1) squares only — 4 meet at each point; (2) equilateral triangles only — 6 at each point; (3) regular hexagons and triangles — 2 hexagons and 2 triangles at each point; (4) squares and triangles — 2 squares and 3 triangles at each point. Regular pentagons alone will not work.
Shapes from the Rhombus — Pages 96–97Cutting a rhombus into four triangles and building with them
With 2 pieces you can make these shapes: two different isosceles triangles, a kite, a rectangle and two different parallelograms.
| Join them along… | How | Shape you get | Sides |
|---|---|---|---|
| the long side | as a mirror | A tall isosceles triangle | 3 |
| the short side | as a mirror | A wide isosceles triangle | 3 |
| the slanting side | as a mirror | A kite | 4 |
| the slanting side | turned half a turn | A rectangle | 4 |
| a short or long side | turned half a turn | A parallelogram | 4 |
You can make 2 different types of triangle. Both of them have exactly 2 equal sides — they are isosceles triangles.
Triangle 2: side, side, long diagonal → two sides equal
A triangle with exactly two equal sides is called an isosceles triangle.
The two bottom angles land exactly on top of each other. So each isosceles triangle has 2 equal angles.
No — not with the pieces of this rhombus. Every triangle you build has exactly 2 equal sides, never 3.
With the rhombus in the book, the base of the taller triangle (the short diagonal) comes out slightly longer than its two equal sides. It is very close, so measure carefully.
Not by joining two pieces. Every triangle made from two pieces has 2 equal sides. (But each single piece is itself a triangle with all three sides unequal — a short side, a long side and a slanting side.)
Try This — Page 97Angles of an equilateral triangle, and the scalene triangle
Yes. All three angles of an equilateral triangle are equal.
Fold so that one corner lands on another: each time the two corners match exactly.
None. All three sides of each new triangle are different lengths. A triangle like that is called a scalene triangle.
No two angles of a scalene triangle are equal. All three angles are different.
Fold one corner onto another: for every pair, one corner sticks out past the other.
Shapes from the Rhombus — Page 98The kite, the parallelogram and the rectangle
You can make 4 different four-sided shapes: a kite, a rectangle, and two different parallelograms. The book shows three of them.
| Join along | Second piece placed as | Shape you get |
|---|---|---|
| slanting side | a mirror | Kite |
| slanting side | turned half a turn | Rectangle |
| short side | turned half a turn | Parallelogram (long one) |
| long side | turned half a turn | Parallelogram (flatter one) |
A kite has two pairs of equal sides, and the equal sides are next to each other. Sides that are next to each other are called adjacent sides.
In both A and B, the sides that are equal are the opposite ones, not the adjacent ones.
In A the opposite angles are equal. In B all four angles are equal, and each one is a right angle — so B is a rectangle.
| Shape | Types of angles | Which angles are equal | Name |
|---|---|---|---|
| A | Two sharp (acute) angles and two blunt (obtuse) angles | The two sharp ones are equal; the two blunt ones are equal — and each pair is opposite | Parallelogram |
| B | Four right angles | All four are equal | Rectangle |
Shapes from the Rhombus — Page 99Drawing on a grid, and building with 3 and 4 pieces
Use the corners of the grid squares as your points. Here are two kites and two parallelograms you can copy.
(b) A 4-sided shape and (c) a 5-sided shape can be made, as shown. (a) With the rhombus in the book, three pieces never close up into an exact triangle — a small step or gap is always left, so the outline has 4 or more sides.
(b) Rectangle, (c) Triangle, (d) Pentagon, (e) Hexagon and (f) Octagon can be made. Only (a) Square cannot.
| Shape | Can you make it? | How |
|---|---|---|
| (a) Square | No | Two pieces make a rectangle with one short side and one long side. The long half-line of this rhombus is not exactly twice the short one, so the pieces never make a square. |
| (b) Rectangle | Yes | Two pieces make one rectangle; place a second such rectangle beside it, long side to long side. |
| (c) Triangle | Yes | Four pieces make one big triangle with every side exactly twice as long as the piece’s sides. |
| (d) Pentagon | Yes | Make a rectangle from 2 pieces. Put the 3rd piece against its short side, and stand the 4th piece on its long top side with its square corner at the same end. |
| (e) Hexagon | Yes | Join 2 pieces along their short sides to make a wide triangle, and put a rectangle of the other 2 pieces under one half of it. |
| (f) Octagon | Yes | Put the four square corners together at one point, each piece turned a quarter turn from the one before, like a windmill. The outline has 8 sides. |
Tangram — Page 99Naming the seven pieces and building shapes with them
A tangram is one square cut into 7 pieces. Here they are, with their names.
| How many | Name of the piece | Number of sides |
|---|---|---|
| 2 | Large triangle | 3 |
| 1 | Medium triangle | 3 |
| 2 | Small triangle | 3 |
| 1 | Square | 4 |
| 1 | Parallelogram | 4 |
| 7 | in all | 5 triangles + 2 four-sided pieces |
Same: five of the seven pieces are triangles, and all five are exactly the same shape — a right-angled triangle with two equal sides. Different: they come in three sizes, and two pieces are not triangles at all.
| What is the same | What is different |
|---|---|
| All 5 triangles have one square corner | They come in 3 sizes — large, medium, small |
| All 5 triangles have 2 equal sides | The square and the parallelogram have 4 sides, not 3 |
| Every corner in the whole set is a right angle, half a right angle or one and a half right angles | The square has 4 equal sides; the parallelogram does not |
| The 2 large pieces match each other; so do the 2 small ones | The medium triangle, the square and the parallelogram cover the same amount of space, but look different |
Every corner in the tangram set is a right angle, half a right angle, or one and a half right angles. Each triangle has one right angle and two equal corners, each half a right angle. The square has four right angles. The parallelogram has two corners of half a right angle and two of one and a half right angles.
Every triangle has 2 equal sides. The square has all 4 sides equal. The parallelogram has its opposite sides equal.
| Piece | What its sides look like | Name for that |
|---|---|---|
| All 5 triangles | two short sides equal, one long slanting side | Isosceles right triangle |
| Square | all four sides equal | Square |
| Parallelogram | opposite sides equal, adjacent sides not | Parallelogram |
The four outlines in the book are a parallelogram, a rectangle, a triangle and a trapezium. Here is one way to make each.
1 Triangle — the two large triangles. 2 Parallelogram — the two large triangles, one turned half a turn. 3 Rectangle — the square and the two small triangles. 4 Trapezium — the square with a small triangle on each side.
Which Shape Am I? — Page 100Matching statements with the square, rectangle, rhombus and parallelogram
Rectangle.
But all sides are not equal → this rules out the square
So the answer is the rectangle
Rhombus.
But all angles are not equal → this rules out the square
So the answer is the rhombus
Two shapes fit: the rhombus and the parallelogram.
No right angles → this rules out the square and the rectangle
What is left: rhombus and parallelogram
Two shapes fit: the rhombus and the parallelogram.
Rhombus: all four sides equal, so that is two pairs as well ✓
No right angle → the square and the rectangle are out
Answer: rhombus and parallelogram
Square.
All sides equal → square or rhombus
Only one shape is in both lists: the square
All four shapes fit: the square, the rectangle, the rhombus and the parallelogram.
| Shape | Opposite angles equal? | Opposite sides equal? | Fits? |
|---|---|---|---|
| Square | Yes (all right angles) | Yes (all equal) | Yes |
| Rectangle | Yes (all right angles) | Yes | Yes |
| Rhombus | Yes | Yes (all equal) | Yes |
| Parallelogram | Yes | Yes | Yes |
Two shapes fit: the rectangle and the square.
Opposite angles equal → true for both
Answer: rectangle and square
| Statement | |
|---|---|
| 1. | All my angles are right angles, but all my sides are not equal. |
| 2. | All my sides are equal, but all my angles are not. |
| 3. | My opposite angles are equal, but my sides do not make a right angle. |
| 4. | Two pairs of sides are equal, but they do not make a right angle. |
| 5. | All my sides make right angles with each other and are equal. |
| 6. | My opposite angles are equal and so are my sides. |
| 7. | My opposite angles are equal and my sides make right angles. |
Yes. Statements 3, 4, 6 and 7 each describe more than one shape.
| Statement | Shape or shapes | How many |
|---|---|---|
| 1. All angles right angles, sides not all equal | Rectangle | 1 |
| 2. All sides equal, angles not all equal | Rhombus | 1 |
| 3. Opposite angles equal, no right angle | Rhombus, Parallelogram | 2 |
| 4. Two pairs of equal sides, no right angle | Rhombus, Parallelogram | 2 |
| 5. All sides equal and all right angles | Square | 1 |
| 6. Opposite angles equal and opposite sides equal | Square, Rectangle, Rhombus, Parallelogram | 4 |
| 7. Opposite angles equal and sides make right angles | Rectangle, Square | 2 |
Kites — Page 100Folding a square sheet into a kite
Follow the four steps and you get a kite — two equal short sides at the square corner, two equal long sides meeting at the tip, and the crease as a mirror line down the middle.
You can see the kite itself, and triangles inside it.
| Where to look | Shape you see | What kind |
|---|---|---|
| The whole outline | Kite | 4 sides: the two short sides at the top are equal, and the two long sides are equal |
| Either side of the middle crease | Triangle | Two equal triangles, mirror images of each other |
| Each folded-in flap (A and B) | Triangle | A long thin triangle |
| The two flaps together | Triangle | One big triangle that runs down to the tip |
| The top part that was not folded | Triangle | A small triangle; its top corner was a corner of the square, so it is a right angle |
Play with Circles — Page 101Two diameters and the shape they make
A rectangle is formed. Its opposite sides are equal and all four of its angles are right angles.
You get a rectangle every single time. Only the size and slant of the rectangle change, never the kind of shape.
| How the two diameters cross | Shape you get |
|---|---|
| At a sharp angle (a narrow cross) | A long, thin rectangle |
| At a wider angle | A shorter, fatter rectangle |
| At a right angle (a plus sign) | A square — which is a special rectangle |
No. Joining the ends of two diameters always gives a rectangle.
Each is cut in half at O
→ the shape is a rectangle
If the diagonals also cross at a right angle → a square
Circle Designs — Page 101Stitching a design on 24 points, and the flower of circles
Keep repeating two moves: jump forward 10 points, then go back 9 points. After 48 straight lines you arrive back at point 1 and the design is complete.
Yes. Draw a middle circle, then four circles of the same size centred on its top, bottom, left and right points. Then, inside each outer circle, draw one more arc of the same size with the compass point on that circle’s far end — these four arcs cut off the outer caps.
Cube Connections — Page 102Views and nets, hollow cube frames, and Nisha’s painted cube
Opposite faces:
sky-blue with yellow circle ↔ pink with blue star
cream with red cross ↔ the sixth face (never shown)
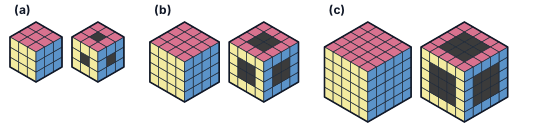
(a) 7 small cubes (b) 32 small cubes (c) 81 small cubes.
| Cube | Size | Small cubes in all | Left in the frame | Removed |
|---|---|---|---|---|
| (a) | 3 × 3 × 3 | 27 | 8 corners + 12 × 1 = 20 | 27 − 20 = 7 |
| (b) | 4 × 4 × 4 | 64 | 8 corners + 12 × 2 = 32 | 64 − 32 = 32 |
| (c) | 5 × 5 × 5 | 125 | 8 corners + 12 × 3 = 44 | 125 − 44 = 81 |
(a) 8 (b) 12 (c) 6 (d) 1
| Where the small cube sits | How many faces are painted | How many such cubes |
|---|---|---|
| At a corner of the big cube | 3 | 8 (a cube has 8 corners) |
| In the middle of an edge | 2 | 12 (a cube has 12 edges, 1 cube on each) |
| In the middle of a face | 1 | 6 (a cube has 6 faces, 1 cube on each) |
| Right in the centre, hidden inside | 0 | 1 |
Puzzle — Page 102Tanu’s row of seven shapes
The order, from left to right, is:
Icosahedron and Dodecahedron — Page 103Counting faces, vertices and edges of two beautiful solids
The names simply say how many faces the solid has.
| Name | Broken into parts | What it means | Number of faces |
|---|---|---|---|
| Icosahedron | icosa + hedron | twenty + faces | 20 |
| Dodecahedron | dodeca + hedron | twelve + faces | 12 |
Icosahedron: equilateral triangles. Dodecahedron: regular pentagons.
Dodecahedron = 12 regular pentagons
Icosahedron: yes. Dodecahedron: yes. In both solids every face is exactly the same shape and the same size.
Icosahedron: 5 faces meet at each vertex. Dodecahedron: 3 faces meet at each vertex. And yes — in both solids the number is the same at every single vertex.
| Solid | Shape of each face | Faces at one vertex | Same at every vertex? | Number of vertices |
|---|---|---|---|---|
| Icosahedron | Equilateral triangle | 5 | Yes | 12 |
| Dodecahedron | Regular pentagon | 3 | Yes | 20 |
Both solids have 30 edges.
The counting trick — count face by face, then halve
Dodecahedron: (12 × 5) ÷ 2 = 60 ÷ 2 = 30 edges
Yes — the cube, the tetrahedron and the octahedron. In all of them the same number of faces meets at every vertex.
| Solid | Faces | Shape of each face | Faces at each vertex | Vertices | Edges |
|---|---|---|---|---|---|
| Tetrahedron | 4 | Equilateral triangle | 3 | 4 | 6 |
| Cube | 6 | Square | 3 | 8 | 12 |
| Octahedron | 8 | Equilateral triangle | 4 | 6 | 12 |
| Dodecahedron | 12 | Regular pentagon | 3 | 20 | 30 |
| Icosahedron | 20 | Equilateral triangle | 5 | 12 | 30 |
Sample answer — the three models in the book are an octahedron, a triangular prism and a pentagonal prism.
| Model | What it is | Clay balls (vertices) | Straws (edges) | Faces |
|---|---|---|---|---|
| The blue one | Octahedron | 6 | 12 | 8 triangles |
| The green one | Triangular prism | 6 | 9 | 2 triangles + 3 rectangles |
| The red one | Pentagonal prism | 10 | 15 | 2 pentagons + 5 rectangles |
Chapter 7 of 15 – Maths
- Previous: Chapter 6 the Dairy Farm
- Next: Chapter 8 Weight and Capacity
- All chapters: NCERT Solutions Class 5 Maths
Also for This Chapter
NCERT Solutions Class 5 Maths Chapter 7 Shapes and Patterns – Overview
| Class | Class 5 |
| Subject | Maths |
| Chapter | 7 – Shapes and Patterns |
| Textbook pages | 92 – 103 |
| Questions solved | 63 |
| Session | 2027 |
| Format | Full answers on this page + PDF |
NCERT Solutions Class 5 Maths Chapter 7 – FAQs
Where can I download NCERT Solutions Class 5 Maths Chapter 7 Shapes and Patterns PDF?
Read every answer on this page, or download the free PDF from the table at the top.
Is this for the 2027 session?
Yes, it follows the latest NCERT Class 5 Maths book for 2027.
How many questions are solved in NCERT Class 5 Maths Chapter 7?
All 63 questions of the chapter (textbook pages 92 – 103) – the in-text questions, activities and the end-of-chapter exercises.
How should I use these solutions?
Read the chapter in the NCERT book first, attempt the questions yourself, then check your answers here.